
Widgets can be embedded on any Facebook page in a custom tab (not groups or profiles), as long as the page has at least 2,000 page likes. You can read our guide on how to embed a widget on Facebook here.
However, with only around 10% of Facebook Business pages actually having more than 2,000 likes, we’re well aware that many of our customers now won’t be able to embed a tab on their page since the new changes came in earlier this year.
Not to worry, while we all want to have as many followers as possible, for most of us that’s easier said than done. We have a solution that means you can have your Widgets on Facebook, but also in a way that means they work on mobile devices, which custom tabs doesn’t allow you to do.
All of our Widgets have a custom URL, which we can provide you. It appears on an otherwise blank webpage and appears full-width unless it is set to be different; it’s also responsive so it will appear correctly on any size screen including mobile.
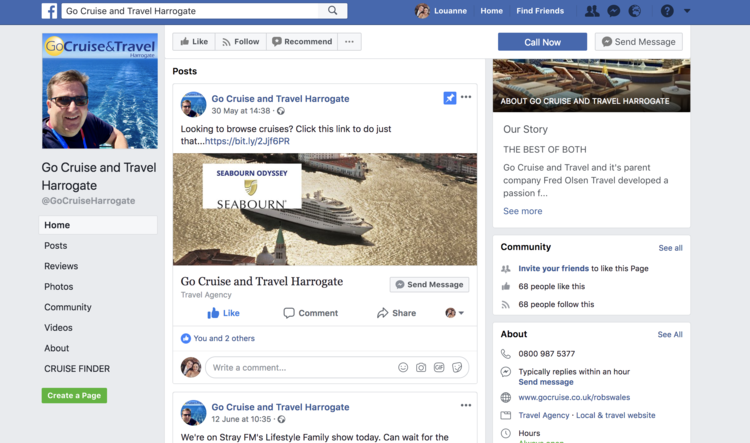
We now suggest that you take this link, shorten it and paste it as a Facebook status. You can include an image with your link, track clicks and even pin it right to the top of your page so that every visitor will see it.
If you wanted to go further, you can Boost the post to a targeted audience for a small fee.
Sound a bit technical? It’s really not – let’s break it down a bit. Below is our complete guide to shortening links, creating a status, adding images and pinning.
The first thing you’ll need is the unique URL to your Widget, which we can either provide you or you can make yourself. (For the ambitious – If you go to your Widget in the Widget Factory and find the page where the embed codes are, you’ll also find a preview link. Take this preview link and change the end of the URL from /preview to .widget; this is your page just for the Widget and nothing else).
The new link will do exactly what you need it to, but it’s very long, not easy to type out and untrackable, so we suggest that you shorten it. There are loads of ways to do this, but we recommend going to www.bitly.com, which is a free service. If you use Hootsuite for your marketing, they have a service called Ow.ly that you can also use for free, but for the rest of this we will be referring to the bitly website.
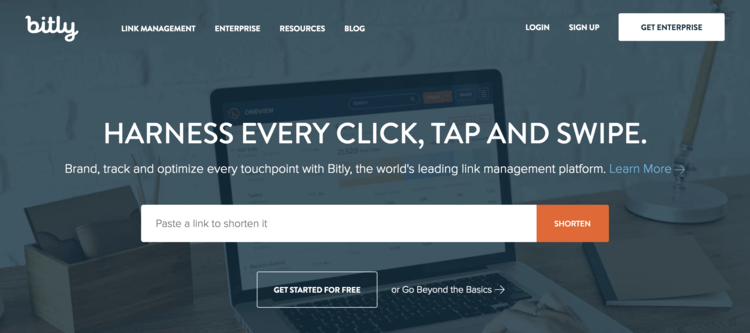
You can make a link shorter and track clicks without even signing up, just paste your link in the box and it will give you a shorter version, easier to share (especially if you want to put it on Twitter as well, where every character counts) and use. When you go back to bitly in the future, it will also tell you how many times the link has been clicked on.
However for much better functionality, you can sign up and create a free bitly account which will allow you to do a lot more, including customising the new URL.
What you have now is a much shorter, user-friendly link that will tell you how often it has been clicked on and where people found it. Now you can go to your Facebook page.
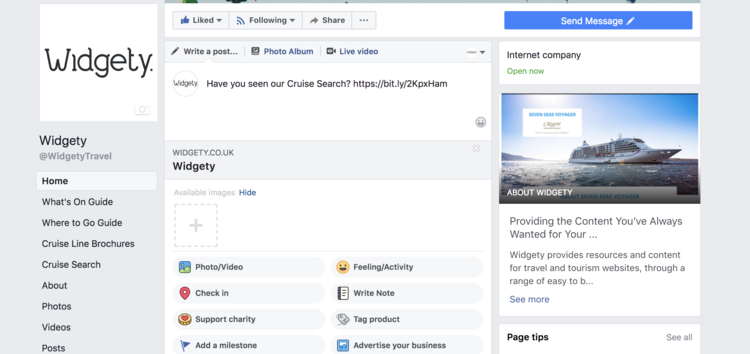
On your page, click on ‘Write a post’ in the same way you usually would to share a status with your followers. Write something about your shiny new Widget “Check out all the attractions nearby!”, “What’s on this weekend? Find out here”, “Still not sure what cruise is best for you? Use our new Cruise Search tool to find out!” etc and then paste in your shortened URL at the end. Facebook will automatically make this a live link that people can click on.
Before you publish your post and release your Widget to the world, by clicking on the ‘+’ beneath the text you can add an image. Facebook posts with images gain up to 40% more engagements than plain text, so it’s worth adding in something eye-catching. This could be a screenshot of your new Widget, or an image from an exciting event you have going on that is listed in it. Choose an image from your computer to upload that will sit with your status and click straight through to your new Widget.
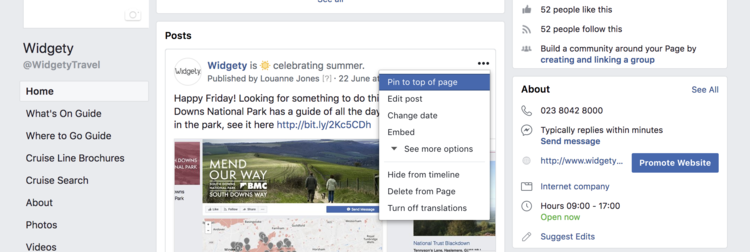
Of course the downside of this is that next time you want to post to Facebook, the Widget post will be pushed down the page, eventually disappearing too far for anyone to scroll to. However, Facebook have a useful feature called ‘Pinning’. If you’re not using it already, this means that you can select a post that either is proving popular, or that you want people to see, and make sure it stays at the top of your page regardless of what else you post.
To do this, click on the three dots on the top right of the status and a drop down menu will appear, click on ‘Pin to top of page’, and it will stay at the top until you click on the three dots again and unpin it.
So now your new Widget is on your Facebook page, on a blank URL (no Widgety logo or anything else), mobile friendly, trackable and always on show.

| Cookie | Duration | Description |
|---|---|---|
| cookielawinfo-checkbox-analytics | 11 months | This cookie is set by GDPR Cookie Consent plugin. The cookie is used to store the user consent for the cookies in the category "Analytics". |
| cookielawinfo-checkbox-functional | 11 months | The cookie is set by GDPR cookie consent to record the user consent for the cookies in the category "Functional". |
| cookielawinfo-checkbox-necessary | 11 months | This cookie is set by GDPR Cookie Consent plugin. The cookies is used to store the user consent for the cookies in the category "Necessary". |
| cookielawinfo-checkbox-others | 11 months | This cookie is set by GDPR Cookie Consent plugin. The cookie is used to store the user consent for the cookies in the category "Other. |
| cookielawinfo-checkbox-performance | 11 months | This cookie is set by GDPR Cookie Consent plugin. The cookie is used to store the user consent for the cookies in the category "Performance". |
| viewed_cookie_policy | 11 months | The cookie is set by the GDPR Cookie Consent plugin and is used to store whether or not user has consented to the use of cookies. It does not store any personal data. |